
Singleton Design Pattern
11 Jul 2020
Contents
- What is Singleton Pattern?
- Why use Singleton Pattern?
- Problems in Singleton Pattern
- Thread-Safe Singleton Pattern
What is Singleton Pattern?
A singleton pattern is a pattern that allows a generated object to be referenced anywhere by creating only one object without using a global variable.
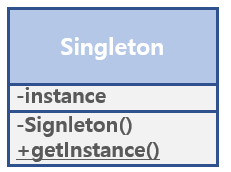
Singleton Pattern is a design pattern in which one class allocates memory only once using static when an application starts, and creates one instance within that memory.
Even if a constructor is called several times, there is only one object that is actually created and the constructor that is called after the initial creation returns the object that was originally created. Use the existing instance instead of creating the same instance when it is needed.
In Java, the constructor is declared private so that other objects cannot be created and the object is used as getInstance().
Why use Singleton Pattern?
Create one instance using new and use fixed memory areas, so it is possble to avoid memory waste.
In addition, instances of a class made of singleton pattern are global instances, making it easy for instances of other classes to share data.
Therefore, Singleton pattern is a pattern for objects that require only one instance to be created. Also, Object loading times are significantly reduced when reusing instance. Therefore, Singleton pattern is better used in situations where multiple common objects must be created and used such as DBCP(Database Connection Pool).
Problems in Singleton Pattern
If a singleton instance does too much work or shares too much data, the degree of coupling between instances in different classes will increase, which will violate the “open-close principle. This makes it difficult to modify and test code.
In addition, two instances can be created without synchronization in a multi-threaded environment.
Thread-Safe Singleton Pattern
1. Eager Initialization (Not Thread-Safe)
- Using the characteristics of the
statickeyword, the instance is registered and used in memory through static binding at the point when the class loader initializes. - This is
not Thread-Safe. - The key point is the
Singleton Patternshould be possible to work in multi-threading environments.So, it should be Thread-Safe.
public class Singleton {
    private static Singleton instance;

    private Singleton() {}

    public static Singleton getInstance() {
        return instance;
    }
}
2. Lazy initialization (Thread-Safe)
- Create an instance variable with
private static. - The private constructor prevents the external creation of the instance.
- Use
synchronizedto make thread-safe. Ensure Thread-safe by specifying a synchronization block for the method.
However, this method is not recommended because synchronized cause relatively large performance degradation. Because whether an instance is created or not, it’s bound to go through a sync block.
public class SystemComponent1 {
    private static SystemComponent1 instance;

    private SystemComponent1() {
    }

    public static SystemComponent1 getInstance() {
        if (instance == null) {
            instance = new SystemComponent1();
        }
        return instance;
    }
}
3. Lazy initialization and Double-checked locking (Thread-Safe)
- Instead of using
synchronizedforgetInstance(), it checks the existence of the instance with the first if statement . - Synchronization blocks are executed only if no instance has been created.
- Therefore, this is
thread-safeand it’s possible to reduce performance reduction as it isnot affected by synchronizedblock since the first instance was created. - By using “volatile”, it ensures that the variable “Instance” is initialized to the Singleton instance correctly, even if you use multi-threading.
public class SystemComponent2 {
    private volatile static SystemComponent2 instance;

    private SystemComponent2() {
    }

    public static SystemComponent2 getInstance() {
        if (instance == null) {
            synchronized (SystemComponent2.class) {
                instance = new SystemComponent2();
            }
        }
        return instance;
    }
}
4. Initialization on demand holder idiom
- Uses the characteristics of
dynamic binding. - It does not initialize the
Holdermethod, it is initialized when calling thegetInstance()method. - Because the instance declared in
holderisstatic, it will only be called once at the time of class loading and the method usedfinalto prevent the allocation of values again. - Performance is superior because concurrency issues are solved without volatile or synchronized keywords.
- This is the most popular way of Singleton implementation.
Let’s think of the component as a speaker and adjust the volume. Set the default volume to 5.
// Initialization on demand holder idiom
public class SystemComponent3 {
    private int volume;

    private SystemComponent3() {
        volume = 5;
    }

    private static class Holder {
        public static final SystemComponent3 INSTANCE = new SystemComponent3();
    }

    public static SystemComponent3 getInstance() {
        return Holder.INSTANCE;
    }

    public int getVolume() {
        return volume;
    }

    public void setVolume(int volume) {
        this.volume = volume;
    }
}
Let’s test the pattern using the last method.
public class Main {
    public static void main(String[] args) {
        // Use Initialization on demand holder idiom
        SystemComponent3 speaker1 = SystemComponent3.getInstance();
        SystemComponent3 speaker2 = SystemComponent3.getInstance();

        System.out.println("Volumn of Speaker1 = " + speaker1.getVolume());
        System.out.println("Volumn of Speaker2 = " + speaker2.getVolume());
        System.out.println();

        System.out.println("Change the Volumn of Speaker2 to 10.");
        // Set Volumn to 10
        speaker2.setVolume(10);

        System.out.println("Volumn of Speaker1 = " + speaker1.getVolume());
        System.out.println("Volumn of Speaker2 = " + speaker2.getVolume());
    }
}
// OUTPUT
Volumn of Speaker1 = 5
Volumn of Speaker2 = 5

Change the Volumn of Speaker2 to 10.
Volumn of Speak1 = 10
Volumn of Speak2 = 10
Here we have two instances speaker1 and speaker2. Next, check the volume of the speaker and it’s all the default.
Then, I changed the volume of speaker2 to 10. Then I checked the volume and it’s all 10.