Factory Method Design Pattern
12 Jul 2020
Contents
- What is Factory Method Pattern?
- Why use Factory Method Pattern?
- Problems in Factory Method Pattern
- Example
- Implementation
What is Factory Method Pattern?
Factory method is literally a factory for something.
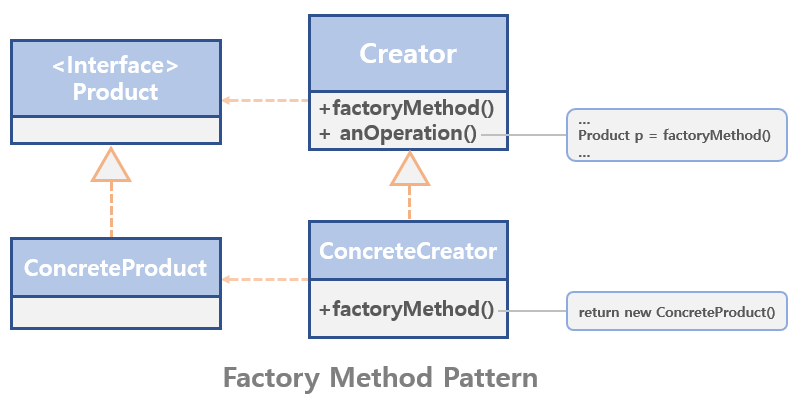
This pattern delegates the part that creates the object to Sub-Class. It means that delegating the part that calls new to the subclass. After all, the factory method pattern is a pattern that creates a factory that creates objects.
- Product(Interface) : A common interface for objects that will be generated as factory methods.
- ConcreteProduct : Class that specifically object is created.
- Creator : Class with Factory Method
- ConcreteCreator : Class that implement factory methods, it creates “ConcreteProduct” objects.
Why use Factory Method Pattern?
The reason for using factory method patterns is to reduce the degree of coupling between classes. The degree of coupling is simply how much other classes affect when a class change occurs. Factory method patterns prevent the creation of objects directly, and you can delegate object creation to subclasses to more efficiently control code or eliminate dependencies. As a result, the coupling can also be reduced.
Also, if you do not abstract the code that generates the object and manage the code in one place, you must modify the entire client code when a change occurs. Since this pattern separates the code portion that creates the object, even if the object is added or modified, it only needs to change the code that creates the object.
Therefore, this pattern is useful to prepare for changes in object creation by separating the object’s creation code into separate classes and methods.
Problems in Factory Method Pattern
There is a possibility of creating many unnecessary classes because you must override the subclass whenever the object increases.
If you want to use a new object, you may need to continue expanding rather than reuse. This means that there are more classes that need to be implemented.
Example
Let’s think of a store that assembles and sells personal computer.
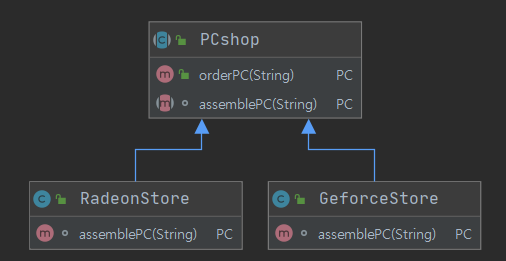
First, create an abstract pc shop.
When an order is placed, select the specific PC that a customer chooses and prepare for sale.
Assembling a PC pc.assemble() and preparing for delivery pc.packing() remains unchanged.
What changes here is the kind of PC that is being sold.
public abstract class PCshop {
    public PC orderPC(String name) {
        PC pc;

        pc = selectPC(name);

        pc.assemble();
        pc.packing();

        return pc;
    }

    abstract PC selectPC(String name);

}
At this time, one person will want to buy Nvidia’s products and another person will want to buy AMD’s products. To do this, in a subclass that inherits the PCshop class, override the select method declared as an abstract method.
Let’s say there are GeforceStore and RadeonStore here.
public class GeforceStore extends PCshop {
    @Override
    PC selectPC(String name) {
        if (name.equals("GamingPC")) {
            return new GeforceGamingPC();

        } else if (name.equals("OfficePC")) {

            return new GeforceOfficePC();

        } else if (name.equals("KidPC")) {

            return new GeforceKidPC();

        } else {

            return null;
        }
    }
}

public class RadeonStore extends PCshop {
    @Override
    PC selectPC(String name) {
        if (name.equals("GamingPC")) {
            return new RadeonGamingPC();

        } else if (name.equals("KidPC")) {

            return new RadeonKidPC();

        } else {

            return null;
        }
    }
GeForce will sell products from GeForce and Radeon will sell products from Radeon. GeForceStore sells gaming, office and Kid computers. And, Radeon sells gaming and kid computers.
The important thing here is that the selectPC in the superclass has no idea what kind of computer can be made. SelectPC method just receives the parts given, assemble and pack them.
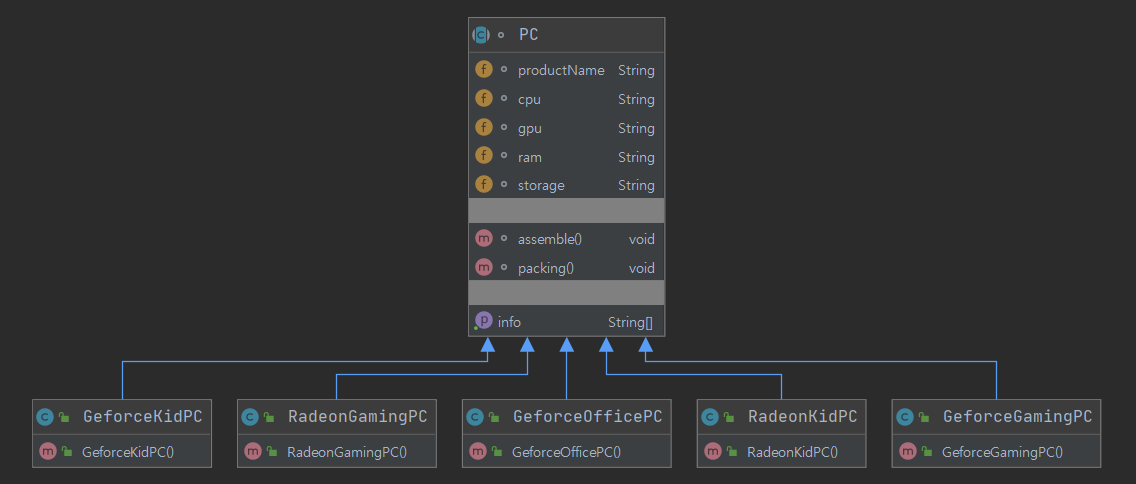
Finally, make a PC. PC will have product, cpu, gpu, ram, storage, etc.
public abstract class PC {
    String productName;
    String cpu;
    String gpu;
    String ram;
    String storage;

    void assemble() {

        System.out.println("Now, assembling your PC.");
    }

    void packing() {

        System.out.println("Now, packing your PC for delivery.");
    }

    public String[] getInfo() {
        String[] productInfo = { productName, cpu, gpu, ram, storage };

        return productInfo;
    }
}
public class GeforceGamingPC extends PC {
    public GeforceGamingPC() {

        productName = "GeForce Gaming PC";
        cpu = "Intel Core i9-9980XE";
        gpu = "GeForce RTX 2080 Ti";
        ram = "32GB";
        storage = "4TB HDD, 1TB SSD";

    }
}

public class GeforceOfficePC extends PC {
    public GeforceOfficePC() {
        productName = "GeForce Office PC";
        cpu = "Intel Core i7-7700K";
        gpu = "GeForce GTX 1060";
        ram = "8GB";
        storage = "1TB HDD, 250GB SSD";

    }
}

public class GeforceKidPC extends PC {
    public GeforceKidPC() {

        productName = "GeForce Kid PC";
        cpu = "Intel Core i5-6500";
        gpu = "GeForce GT 1030";
        ram = "4GB";
        storage = "125GB SSD";

    }
}
public class RadeonGamingPC extends PC {
    public RadeonGamingPC() {

        productName = "Radeon Gaming PC";
        cpu = "AMD Ryzen 9 3950X";
        gpu = "AMD Radeo VII";
        ram = "32GB";
        storage = "4TB HDD, 1TB SSD";

    }
}

public class RadeonKidPC extends PC {
    public RadeonKidPC() {

        productName = "Radeon Kid PC";
        cpu = "AMD Opteron 6276";
        gpu = "AMD Radeon R72402364P";
        ram = "4GB";
        storage = "125GB SSD";

    }
}
Finally, let’s make a main class and order a PC we want.
Let’s buy a gaming PC at GeForcestore, and a kid PC at Radeonstore.
import java.util.Arrays;

public class PCshopTest {
    public static void main(String[] args) {
        PCshop gGaming = new GeforceStore();
        PCshop rKid = new RadeonStore();

        PC pc1 = gGaming.orderPC("GamingPC");
        System.out.println("The computer you bought at the GeForce store --> " + Arrays.toString(pc1.getInfo()));
        System.out.println();

        PC pc2 = rKid.orderPC("KidPC");
        System.out.println("The computer you bought at the Radeon store --> " + Arrays.toString(pc2.getInfo()));
    }
}
// Output
Now, assembling your PC.
Now, packing your PC for delivery.
The computer you bought at the GeForce store --> [GeForce Gaming PC, Intel Core i9-9980XE, GeForce RTX 2080 Ti, 32GB, 4TB HDD, 1TB SSD]

Now, assembling your PC.
Now, packing your PC for delivery.
The computer you bought at the Radeon store --> [Radeon Kid PC, AMD Opteron 6276, AMD Radeon R72402364P, 4GB, 125GB SSD]


